Now Reading: Acrylic Nail Tips for Beginners: What Nobody Tells You First
-
01
Acrylic Nail Tips for Beginners: What Nobody Tells You First
Acrylic Nail Tips for Beginners: What Nobody Tells You First
Acrylic Nail Tips for Beginners: What Nobody Tells You Before You Start
There is something very exciting about wanting your first set of acrylic nails and something quietly intimidating about not knowing where to begin. The supply list alone can feel overwhelming. Monomer, primer, kolinsky brush, nail forms, nail tips, it reads like a foreign language if nobody has walked you through it before. This post fixes the problem that most guides do by assuming you already know half of it.
Here you will find a real beginner’s guide to acrylic nail tips that covers the steps and the reasons behind them. You will be learning what supplies actually matter, how to prep your nails properly so the acrylic actually sticks, a guide to apply your first set without disaster, and solutions for when things go sideways. Because they will, at least once. And knowing why makes all the difference.
In This Post
- What You Actually Need to Get Started
- Tips vs. Forms: Which Should a Beginner Use?
- How to Prep Your Nails Before Applying Acrylics
- How to Apply Acrylic Nail Tips Step by Step
- Why Do Acrylic Nails Lift and How to Stop It
- How Often Should You Get Acrylic Nails Filled?
- Does Acrylic Damage Your Nails?
- Mistakes That Ruin a First-Time Acrylic Application
- How to Remove Acrylic Nail Tips at Home Safely
- When to See a Nail Technician or Dermatologist
Quick Answer: When you focus on three things, Acrylic nail tips for beginners work best: firstly, thorough nail preparation, secondly, the right liquid-to-powder ratio when mixing your acrylic bead, and lastly, keeping the product away from your cuticles. Most first-time lifting and bubbling problems come down to skipping prep or working too wet. Start with a beginner-speed monomer, practice your bead consistency before applying to nails, and use a nail primer before your acrylic.
What You Actually Need to Get Started
You always need the right tools before anything touches your nails. It’s about the right one and not the most expensive one. One of the fastest ways to get frustrated with acrylics is buying a random kit from a discount site before you have even given yourself a fair chance.
Here is what actually matters:
- Acrylic powder: Start with a clear or natural pink shade. This makes imperfections less visible, making it more forgiving for beginners.
- Acrylic liquid monomer: This is a liquid that activates the powder and creates the bead. Buy a medium or slow-speed monomer as a beginner. A fast-setting monomer gives you almost no working time.
- Kolinsky acrylic brush: An 8 or 10 size kolinsky brush is the standard starting point. Strictly avoid synthetic brushes. They absorb monomers badly, and the acrylic sticks to the hair, which makes application a nightmare.
- Nail tips: Pre-shaped plastic extensions that add length before the acrylic goes on. More on these in the next section.
- Nail glue: This secures your nail tips before applying acrylic.
- Nail primer: This is the step most beginners skip and then wonder why their acrylic lifts. Primer creates a chemical bond between your natural nail plate and the acrylic. It is not optional.
- A nail file and buffer: You will need both. A 100/180 grit file for shaping and a softer buffer for smoothing the finished nail.
- Pure acetone: Use it for cleanup, brush cleaning, and eventual removal.
- Cuticle pusher: Both metal and wood work. This is part of your prep, not an afterthought.
That is genuinely all you need to start. Everything else can come later once you know what you are doing, like pinching tools, e-files, and dappen dishes.
Tips vs. Forms: Which Should a Beginner Use?Here’s the question almost no beginner guide addresses properly. So let’s settle it.
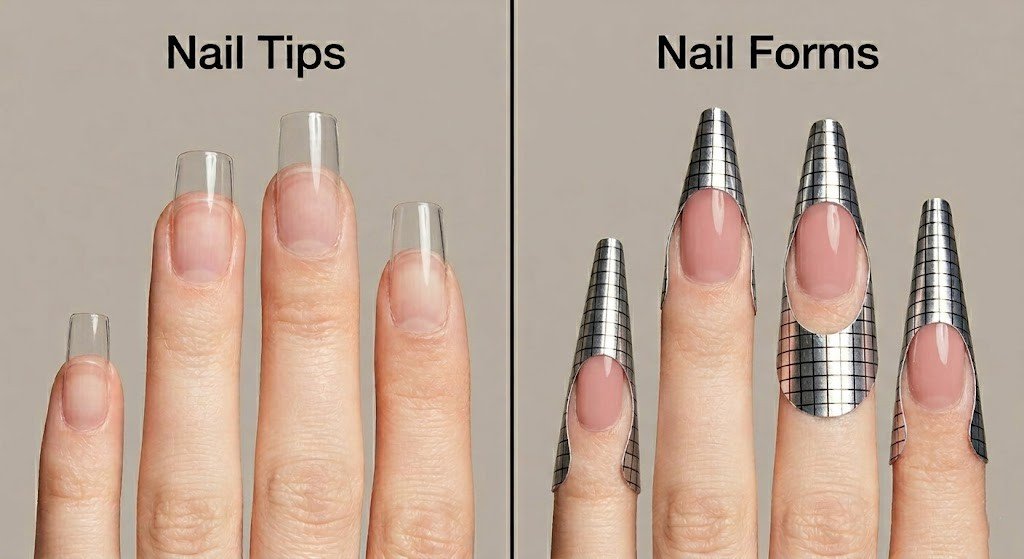
Nail tips are actually pre-shaped plastic extensions that are glued onto the end of your natural nail before applying acrylic over the top. They give you a defined shape to work over and instant artificial length. Tips are the right choice for most beginners. They let you focus more on getting the acrylic application right first by taking away one variable, building the length and shape from scratch.
Nail forms are thin paper or foil guides that tuck under the free edge of your natural nail. You build the acrylic extension directly onto the form, then peel it away once the acrylic sets. This is called sculpting. It produces a stronger, more seamless result. It is also significantly harder to do well and requires more product control than most beginners have on their first attempt.
The verdict? Start with tips. Once your bead consistency is solid and your application feels controlled, explore forms. There is no shame in using tips. Professional nail technicians use them regularly, and so do plenty of experienced home users.
How to Prep Your Nails Before Applying Acrylics
Where most home applications succeed or fail is in nail preparation for acrylic nails. Cuticle prep is the foundation of everything; skip it or rush it, and no amount of good product will save your set from lifting. You should not rush through this step. Spend more time here than anywhere else.
Pushing Back the Cuticle
To gently push the cuticle back toward the base of the nail, use a cuticle pusher. Ensure that no cuticle tissue remains sitting on the nail plate surface. Acrylic will only bond to the nail plate itself, not with cuticle skin. Gaps, created by cuticles left on the surface, are where lifting begins.
Cut your cuticles after applying acrylics. Cutting creates tiny open areas near the nail fold, which raises infection risk and may lead to discomfort when the monomer contacts broken skin.
Buffing the Nail Plate
Use a medium-grit buffer to lightly remove the natural shine from every nail. You are not trying to thin the nail, just scuff the surface so the primer and acrylic have something to grip. A shiny nail plate is essentially a smooth, non-porous surface. Acrylic needs texture to bond properly.
Wipe away all dust with a lint-free pad and a small amount of pure acetone. Any debris left on the nail plate will get trapped under the acrylic and can cause cloudiness or weak spots.
Applying Nail Primer
Apply a thin coat of acid-based or acid-free primer to each nail and allow it to dry until it looks slightly chalky and matte. Do not touch the nails after priming. The primer chemically prepares the nail plate surface to accept the acrylic. Skipping this step is the single most common reason beginner sets lift within the first week.
How to Apply Acrylic Nail Tips Step by Step
This is where your practice pays off. Do not rush. Work on one hand at a time and focus on one nail at a time.
Sizing and Gluing the Tip
Hold each nail tip against your natural nail before gluing anything. The tip should cover the width of your nail plate without overlapping the skin on either side. It should neither be too wide, as it looks unnatural and can press against the nail fold. Nor too narrow, the acrylic will have weak edges.
Apply a small drop of nail glue to the well of the tip, the curved section that sits against your nail. Press it firmly onto the free edge of your natural nail at a 45-degree angle, then press flat and hold for ten seconds. The bond should feel immediate and solid. Trim the tip to your desired length with nail tip cutters before applying any acrylic.
Mixing and Applying the Acrylic Bead
Dip your Kolinsky brush into the monomer liquid first. Wipe away excess liquid on the side of your dappen dish. You want the brush damp, not dripping. Then dip the tip of the brush into your acrylic powder and allow a small bead to form naturally at the brush tip.
The consistency you are looking for is sometimes described as like wet sand that holds its shape. Too wet and the bead will spread uncontrollably and flood your cuticle. Too dry and it will drag and look streaky.
Place your first bead at the stress area, the point where the natural nail meets the tip. This is the part of the nail that takes the most pressure, so it needs the most product. Work a second smaller bead near the cuticle area, keeping a clean gap of about one and a half millimeters between the acrylic and the cuticle. Never let the product touch the skin.
Use your brush to gently pat and smooth the acrylic while it is still workable. Work quickly but without panic. A medium-speed monomer gives you roughly 45 to 60 seconds of working time per nail.
Filing and Shaping
Once the acrylic sets, test it by tapping gently with the back of your brush; a firm clicking sound means it is ready. Use your 100-grit file to shape the nail. File the sides first to define the shape, then file across the top surface to remove any unevenness. Finish with your buffer to smooth the entire nail surface before moving to the top coat.
Finishing with Top Coat
Apply a thin, even coat of top coat over each nail, making sure to cap the free edge by running the brush along the tip of the nail. This seals the acrylic and significantly extends the life of your set. Cuticle oil on the surrounding skin finishes the look and keeps everything hydrated.
Why Do Acrylic Nails Lift and How to Stop It
Lifting is the most common problem beginners face. And it almost always comes back to one of four things.
Prep was rushed. If the nail plate still had shine, oils, or cuticle tissue on it when the acrylic went down, it had nothing solid to bond to. Nail Lifting was guaranteed from the moment you applied the tip.
The product touched the cuticle. Even a tiny amount of acrylic sitting against the skin creates a lever. Every time you flex your finger, that contact point pulls the acrylic away from the nail plate underneath.
The bead was too wet. Excess monomer weakens the bond. A properly mixed bead with the right liquid-to-powder ratio cures into a dense, adhesive layer. A wet bead cures into a weaker one.
The stress area was too thin. The point where the natural nail ends and the tip begins is where your nail bends under pressure. If the acrylic is thin there, it will crack or separate. This area needs more product than anywhere else on the nail.
Fix the prep, fix the bead, build up the stress area. These three adjustments alone will eliminate most lifting problems before they start.
How Often Should You Get Acrylic Nails Filled?
Most people need a fill every two to three weeks. That is the window where the natural nail has grown out enough to create a visible gap at the base, but the acrylic is still structurally sound.
Leaving it longer than three weeks puts strain on the nail. The gap between the acrylic and your cuticle gets wider, the leverage on the nail plate increases, and the risk of the whole set cracking or lifting dramatically goes up. It also creates a warm, slightly moist space under the acrylic that can allow bacteria or a nail fungus to develop.
Two to three weeks. Set a reminder if you need to.
Does Acrylic Damage Your Nails?
Honestly? It can. But it does not have to.
Acrylic nail damage tends to come from two places, not from the acrylic itself. The first is over-aggressive prep. If someone files too aggressively during prep or during a fill, they thin the nail plate over time. The nail bed, the skin directly beneath the nail plate, can become sensitive and tender after repeated aggressive filing or improper removal.” The nail plate is made of layers of keratin. Those layers have a limit. The second is improper removal. Specifically, peeling or prying the acrylic off instead of soaking it properly in acetone.
When acrylic is removed correctly, the nail plate underneath is usually in reasonable condition. When it is peeled off, which feels satisfying, it strips the top layers of the nail plate with it, and the nails are left thin, soft, ridged, and sensitive.
According to the American Academy of Dermatology, artificial nail products that are properly applied and properly removed do not have to cause lasting nail damage. The issue is almost always technique, not the product itself.
So the answer is: acrylic does not automatically damage your nails. Rushing the prep, over-filing, and peeling them off does.
If you notice unusual ridging after removing acrylics, it is worth understanding what your nails are trying to tell you. Here is what nail ridges actually mean and what causes them.
Mistakes That Ruin a First-Time Acrylic Application
These are the specific errors that separate a frustrating first attempt from a successful one. Every single one is avoidable once you know what to watch for.
- Skipping primer entirely. This is the fastest route to lifting. Primer is not optional. Full stop.
- Working with a brush that is too wet. If you see the acrylic bead spreading and thinning the moment it hits the nail, your brush has too much monomer in it. Wipe more off before picking up powder.
- Applying acrylic too close to the cuticle. Leave that one and a half millimeter gap every single time. Products touching skin will always lift.
- Filing too aggressively during prep. You only need to remove the shine. You do not need to thin the nail. Buffing lightly is enough.
- Applying the tip at the wrong angle. The tip goes on at roughly 45 degrees, then presses flat. Pressing flat immediately without the angle traps air under the well of the tip, creating a weak bond and sometimes a visible bubble.
- Rushing the drying time. Acrylic that is not fully cured will dent, smudge, and shape unevenly. Wait for the click before you file.
How to Remove Acrylic Nail Tips at Home Safely
If you do not rush, removing acrylic nail tips at home is straightforward.
You will need pure acetone, not nail polish remover, not acetone-based remover mixed with other ingredients. Pure acetone only.
Clip your nails as short as possible before you begin. File the top surface of each nail lightly to break through the top coat and shiny layer of acrylic. This allows the acetone to penetrate faster. Soak a small piece of cotton in pure acetone, place it directly over each nail, wrap each finger in foil, and leave for twenty to twenty-five minutes.
When you unwrap, the acrylic should have softened into a gummy, gel-like texture. Use a cuticle pusher to gently slide it away from the nail. If it is not moving easily, wrap again for another ten minutes. Never force it.
Once all the acrylic is removed, buff the nail surface lightly to remove any remaining residue and apply a nourishing cuticle oil to every nail and the surrounding skin. It’s normal to feel the nail plate slightly sensitive.
When to See a Nail Technician or Dermatologist
Most acrylic problems, like lifting, uneven application, and breakage, are actually technique issues that you can easily troubleshoot at home. But some situations deserve a professional eye.
See a nail technician if your acrylic consistently lifts within days of application despite correcting your prep and bead consistency. There may be an issue with product compatibility or an underlying nail surface problem that is hard to diagnose without seeing it in person.
See a dermatologist if you notice any of the following after wearing acrylics: green or brown discoloration under the nail, which can indicate a bacterial infection. unusual thickening of the nail plate.Pain or tenderness around the nail fold or nails that remain unusually thin and brittle for more than several weeks after removal. These are not reasons to panic, but they are worth a professional opinion rather than a Google search.
While your nails recover, supporting faster natural nail growth helps rebuild the nail plate more quickly.
Getting your first set of acrylic nails right is genuinely about patience more than skill. The prep takes longer than you think it should. The bead feels unpredictable the first few times. And that is completely normal. Every experienced nail enthusiast has at least one horror story from their first attempt.What you know now that most beginners do not: the prep is everything, the bead ratio matters, and the stress area needs the most product. Keep those three things in your head on your first application, and you are already ahead of where most people start.